From Terraform to a Running Container: Deploying an ECR Image to AWS EC2
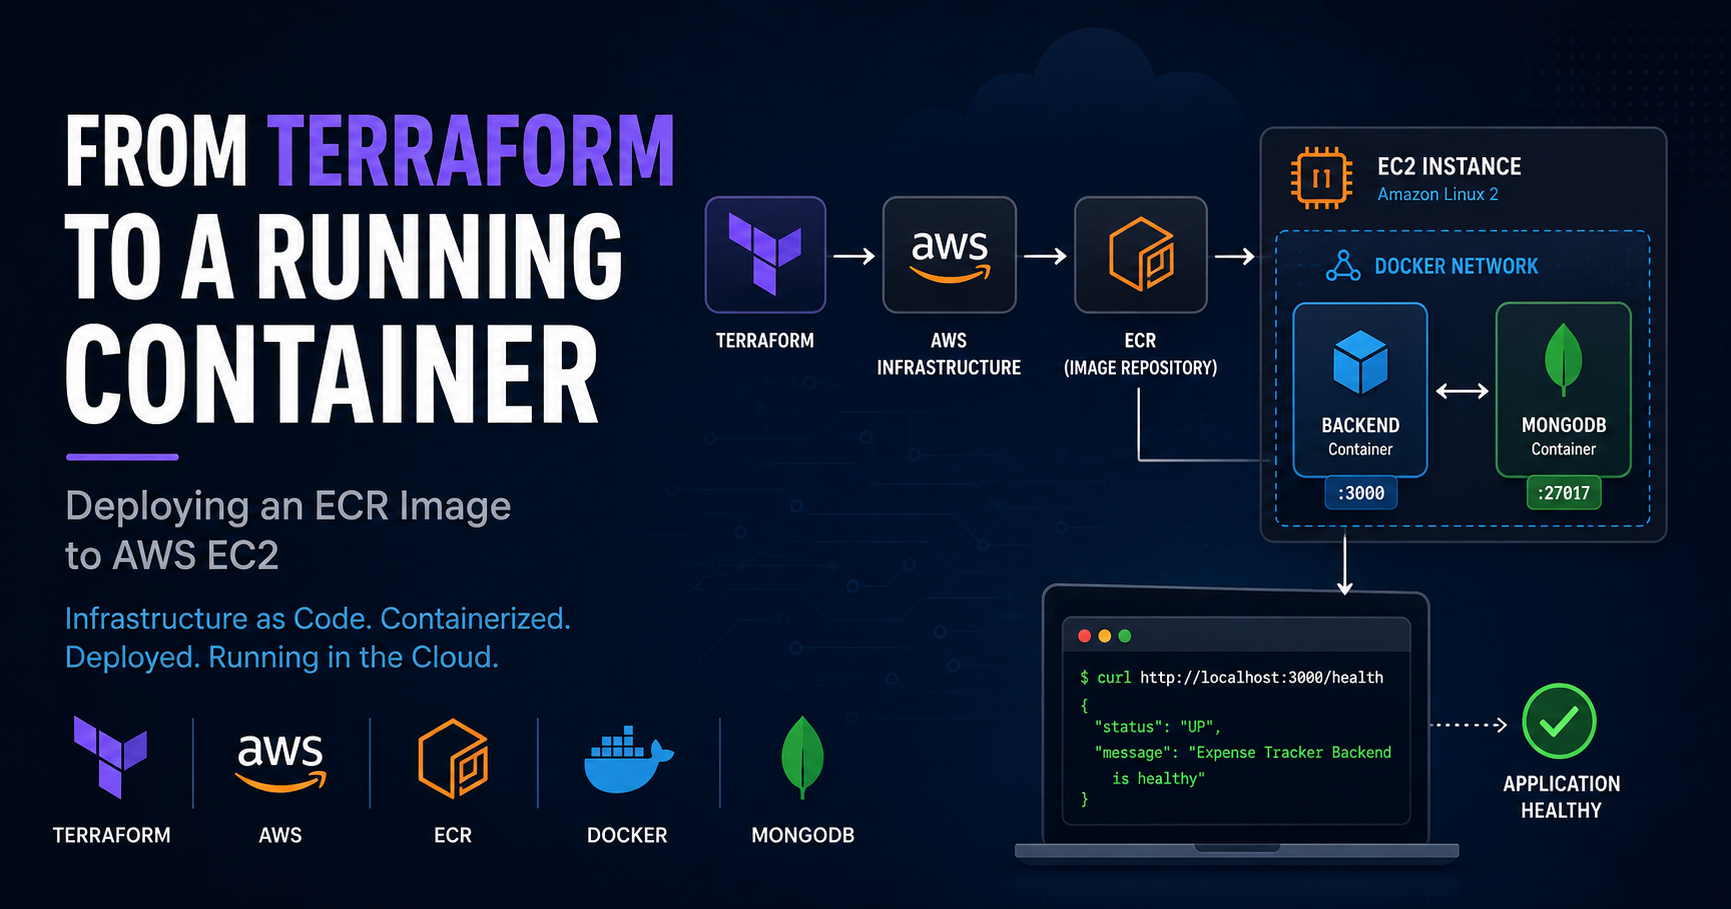
When I started learning DevOps, I initially thought of infrastructure provisioning and application deployment as two separate problems.
Terraform creates the infrastructure.
Docker runs the application.
AWS hosts the infrastructure.
But the more I worked through my DevOps project, the more I realized that these pieces only become meaningful when they work together.
So for this milestone, I wanted to answer a practical question:
Can I provision AWS infrastructure with Terraform, store my application image in Amazon ECR, and then deploy that image directly to an EC2 instance?
The answer is yes.
And more importantly, I learned what each component is actually responsible for.
The Goal
The objective was to build an AWS deployment flow where:
Terraform
    ↓
AWS Infrastructure
    ↓
EC2 Instance
    ↓
Pull Docker Image from ECR
    ↓
Run Application Container
    ↓
Connect to MongoDB
    ↓
Application Health Check
The application is an Expense Tracker backend built with Node.js and MongoDB.
The Docker image was built beforehand and pushed to Amazon Elastic Container Registry (ECR).
Terraform was then responsible for the AWS infrastructure required to run it.
1. Structuring the Terraform Project
Before deploying anything, I wanted the Terraform project to have a structure that could scale beyond a single resource.
The project follows a modular approach:
terraform/
└── labs/
    └── aws/
        ├── environments/
        │   └── dev/
        │       ├── main.tf
        │       ├── variables.tf
        │       ├── terraform.tfvars
        │       ├── outputs.tf
        │       ├── providers.tf
        │       ├── versions.tf
        │       ├── backend.tf
        │       └── iam.tf
        │
        └── modules/
            ├── storage/
            ├── networking/
            ├── security/
            ├── compute/
            └── ecr/
This separation helped me understand an important Terraform concept:
The root module composes the infrastructure, while child modules own specific responsibilities.
For example:
networkingmanages the VPC and subnetsecuritymanages the security groupcomputemanages the EC2 instancestoragemanages S3ecrmanages the container registryiam.tfmanages the IAM resources required by the environment
This makes adding another resource much more deliberate.
2. Terraform's Role
One of the biggest lessons from this milestone was understanding what Terraform should and should not do.
Terraform was responsible for provisioning the infrastructure.
That included resources such as:
VPC
Subnet
Route table
Internet Gateway
Security Group
EC2 instance
IAM role and instance profile
ECR repository
S3 resources
Terraform was not responsible for building my Docker image or manually starting the application container.
That distinction became very important.
The infrastructure layer and application runtime layer are different concerns.
3. Amazon ECR as the Artifact Registry
Once the Docker image was built, I pushed it to Amazon ECR.
The repository was:
expense-tracker-dev-backend
The image was tagged:
1.0.0
The resulting image reference was:
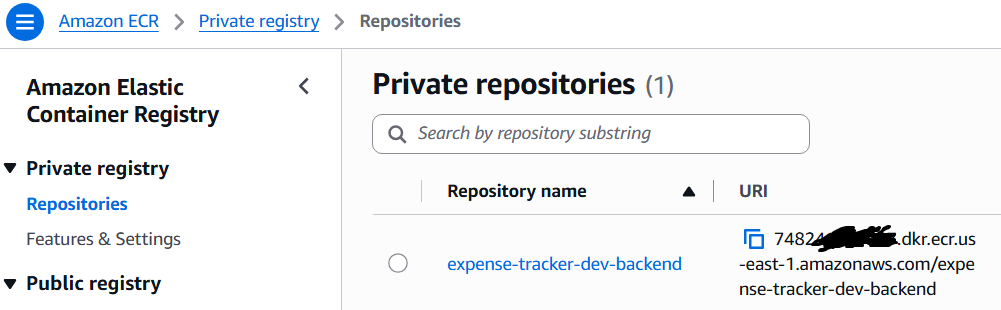
748241.dkr.ecr.us-east-1.amazonaws.com/expense-tracker-dev-backend:1.0.0
This changed the deployment model.
Instead of copying source code to the EC2 server and building the application there, the server could simply retrieve the already-built artifact.
That means:
Developer/CI
    ↓
Build Docker Image
    ↓
Push Image
    ↓
ECR
    ↓
EC2 pulls image
    ↓
Run container
The EC2 instance doesn't need to rebuild the application.
It consumes the artifact.
4. IAM: Giving EC2 Permission to Pull from ECR
An EC2 instance needs permission to access ECR.
Instead of storing AWS credentials inside the server, I attached an IAM role to the EC2 instance through an instance profile.
The role was given permission to:
ecr:GetAuthorizationToken
ecr:BatchCheckLayerAvailability
ecr:GetDownloadUrlForLayer
ecr:BatchGetImage
ecr:DescribeImages
This allowed the EC2 instance to authenticate with ECR and retrieve the application image.
This reinforced another important DevOps principle:
Use IAM roles for AWS workloads instead of embedding long-lived AWS access keys inside applications or servers.
5. The Application Dependency Problem
At this point, I encountered an important architectural question.
The backend application uses MongoDB.
But the Docker image only contains the backend application.
It does not contain MongoDB.
So simply running:
docker run ...
for the backend would not be enough.
The application needs a MongoDB instance that it can reach over the Docker network.
This is where understanding application dependencies became important.
The architecture became:
EC2
│
├── Docker Network
│
├── MongoDB Container
│
└── Backend Container
       │
       └── connects to MongoDB
6. Creating the Docker Network
I created a dedicated Docker network on the EC2 instance:
docker network create expense-network
I then verified that the network existed:
docker network ls
The purpose of the network was to allow the containers to communicate with each other using Docker's internal networking.
7. Running MongoDB
MongoDB was started as a separate container:
docker run -d \
  --name mongodb \
  --network expense-network \
  -v mongo-data:/data/db \
  --restart unless-stopped \
  mongo:4.4
One deliberate decision here was not to publish MongoDB's port to the public internet.
MongoDB only needed to be reachable by the backend container.
The backend could therefore communicate with:
mongodb:27017
through the Docker network.
This is much better than unnecessarily exposing the database publicly.
8. Running the Backend from ECR
With MongoDB running, I pulled and ran the application image from ECR.
The backend container was started with:
docker run -d \
  --name backend \
  --network expense-network \
  -p 3000:3000 \
  -e APP_ENV=docker \
  -e PORT=3000 \
  -e MONGO_URL=mongodb://mongodb:27017/expense-tracker \
  --restart unless-stopped \
  748241.dkr.ecr.us-east-1.amazonaws.com/expense-tracker-dev-backend:1.0.0
The important part here is that the container is using the image that already exists in ECR.
The EC2 instance is not building the image.
It is consuming the image.
9. Verifying the Containers
I checked the running containers with:
docker ps
The result showed both:
backend
mongodb
running on the same Docker network.
The backend exposed:
3000:3000
while MongoDB remained internal to the Docker network.
10. Checking the Application Logs
Next, I checked the backend logs:
docker logs backend
The application reported:
Starting application with 'local' configuration
MongoDB Connected to mongodb
Server is listening on http://localhost:3000
The most important line was:
MongoDB Connected to mongodb
This proved that the backend container could successfully communicate with the MongoDB container through Docker networking.
11. An Unexpected Configuration Observation
There was also an interesting configuration issue.
I passed:
-e APP_ENV=docker
when starting the container.
However, the application logs still showed:
APP_ENV=local
The reason was in the application's package.json.
The start script contained:
"start": "APP_ENV=local node server.js"
Therefore, the start command itself was explicitly setting APP_ENV to local.
This was a useful debugging lesson.
It reminded me that when environment variables don't behave as expected, I need to inspect the entire configuration chain:
Docker environment
        ↓
Container startup command
        ↓
package.json
        ↓
Application code
        ↓
Configuration file
The important thing is that the application still successfully connected to MongoDB because the explicitly supplied MONGO_URL was used.
12. The Final Health Check
The final test was:
curl http://localhost:3000/health
The application returned:

{
  "status": "UP",
  "message": "Expense Tracker Backend is healthy"
}
At this point, the complete deployment path was working.
13. What I Had Actually Built
The final architecture looked like this:
                 Developer / CI
                       │
                       │ Docker Image
                       ▼
                 Amazon ECR
                       │
                       │ Pull
                       ▼
              ┌─────────────────┐
              │      AWS EC2     │
              │                  │
              │  Docker Network  │
              │                  │
              │  ┌────────────┐  │
              │  │  Backend   │  │
              │  │  :3000     │  │
              │  └─────┬──────┘  │
              │        │         │
              │        ▼         │
              │  ┌────────────┐  │
              │  │  MongoDB   │  │
              │  │  :27017    │  │
              │  └────────────┘  │
              └─────────────────┘
                       │
                       ▼
                  Health Check
And Terraform sits underneath the infrastructure layer:
Terraform
    │
    ├── VPC
    ├── Subnet
    ├── Route Table
    ├── Internet Gateway
    ├── Security Group
    ├── EC2
    ├── IAM
    └── ECR
14. Terraform vs Docker
This milestone helped me clearly separate the responsibilities of the tools.
Terraform
Terraform answers:
What infrastructure should exist?
It provisions and manages AWS resources.
Docker
Docker answers:
How should the application run?
It packages and runs the application and its runtime dependencies.
ECR
ECR answers:
Where should the container artifact be stored?
It provides a registry for Docker images.
EC2
EC2 answers:
Where should the container actually run?
It provides the compute environment.
This distinction is simple, but understanding it has completely changed how I think about DevOps architecture.
15. The Deployment Flow
The complete flow can now be summarized as:
Application Source Code
        ↓
Docker Build
        ↓
Docker Image
        ↓
Amazon ECR
        ↓
Terraform-Provisioned EC2
        ↓
EC2 Authenticates to ECR
        ↓
Docker Pull
        ↓
MongoDB Container Starts
        ↓
Backend Container Starts
        ↓
Backend Connects to MongoDB
        ↓
Health Check
        ↓
Application Running
16. What I Learned
This milestone taught me much more than simply running a Terraform command.
1. Infrastructure and application deployment are different layers
Terraform provisions the infrastructure.
Docker runs the application.
Understanding this separation makes architecture much easier to reason about.
2. An image is an artifact
Once the image is pushed to ECR, the deployment server does not need to rebuild it.
It retrieves the artifact and runs it.
3. Applications have dependencies
The backend image did not magically include MongoDB.
I had to identify the runtime dependency and make it available.
4. Docker networking matters
Containers can communicate using service/container names through a Docker network.
In this case:
mongodb:27017
was enough for the backend to reach MongoDB.
5. IAM roles are important
The EC2 instance accessed ECR through an IAM role rather than hard-coded AWS credentials.
6. Debugging requires following the entire chain
The APP_ENV behavior was a good example.
The problem wasn't necessarily Docker.
The application's own startup command was overriding the environment variable.
7. Health checks matter
A container being Up doesn't automatically mean the application is working.
The health endpoint gave me a much stronger confirmation:
{"status":"UP","message":"Expense Tracker Backend is healthy"}
17. What I Would Improve for Production
This deployment works, but I wouldn't call it production-ready yet.
There are several areas I would improve.
Security
SSH should not be unnecessarily exposed to the entire internet.
The application should also have a properly designed ingress strategy rather than exposing services indiscriminately.
Configuration
The application should avoid hard-coding environment selection inside the startup script.
Configuration should be controlled consistently through the deployment environment.
Deployment Automation
The Docker commands were executed manually.
The next step is to automate this process.
Image Immutability
For stronger production deployments, I would prefer deploying using immutable image references such as image digests rather than relying only on mutable tags.
Database Architecture
Running MongoDB as a container on the same EC2 instance is appropriate for this learning environment, but a production system would require a more resilient database architecture.
18. The Next Evolution: CI/CD
This milestone also gives me a clear picture of where CI/CD fits.
Today, the process is:
Developer
   ↓
Build Image
   ↓
Push to ECR
   ↓
SSH to EC2
   ↓
Pull Image
   ↓
Run Container
The next evolution is:
Developer
   ↓
GitHub
   ↓
CI Pipeline
   ↓
Test
   ↓
Build Docker Image
   ↓
Push to ECR
   ↓
Deployment Automation
   ↓
EC2
   ↓
Pull Image
   ↓
Run New Version
This is where Jenkins or GitHub Actions becomes valuable.
The manual deployment I completed here becomes the baseline that automation will reproduce.
That is an important distinction.
I don't want to automate something I don't understand.
First:
Make it work manually.
Then:
Understand every step.
Then:
Automate the repeatable steps.
19. The Terraform CI/CD Flow
Terraform itself can also be integrated into a CI/CD workflow.
A future Terraform pipeline could look like:
Git Push
   ↓
terraform fmt
   ↓
terraform validate
   ↓
terraform plan
   ↓
Review
   ↓
terraform apply
This creates a more controlled infrastructure delivery process.
The important principle is that infrastructure changes should be reviewed before they are applied.
20. If I Were Asked About This in an Interview
If an interviewer asked:
"How would you deploy a Dockerized application to AWS using Terraform and ECR?"
I could now explain it from experience rather than theory:
I would use Terraform to provision the AWS infrastructure, including the VPC, subnet, security group, EC2 instance, IAM role, and ECR repository. The application would be packaged as a Docker image and pushed to ECR. The EC2 instance would use an IAM role to authenticate to ECR and pull the image. Runtime dependencies such as MongoDB would be provided separately, and the containers would communicate through a private Docker network. The application would then be started on EC2 and verified through a health check. Once the manual flow is proven, I would automate the build, image push, and deployment using a CI/CD pipeline.
That's a much stronger answer than simply saying:
"I know Terraform and Docker."
21. The Biggest Lesson
The biggest lesson from this milestone wasn't a Terraform command.
It was understanding the relationship between the tools.
Terraform doesn't replace Docker.
Docker doesn't replace Terraform.
ECR doesn't run the application.
EC2 doesn't build the application artifact.
Each component has a responsibility.
The real DevOps skill is understanding how those responsibilities connect.
22. Final Result
At the end of this milestone, I had successfully demonstrated:
Terraform
   ↓
AWS Infrastructure
   ↓
IAM
   ↓
EC2
   ↓
ECR
   ↓
Docker
   ↓
MongoDB
   ↓
Node.js Backend
   ↓
Health Check
The application was running successfully on AWS EC2 from an image stored in ECR.
This completed an important part of my Infrastructure as Code journey.
More importantly, I now have a working baseline that can be automated.
And that's where the next chapter begins:
CI/CD.